Friday, November 20, 2015

Armikrog Fabrication

Last year I worked as an intern at Pencil Test Studios and had an awesome time making stuff for Armikrog. Mike Dietz and Ed Schofield are the dynamic duo behind this fun and quirky stop motion point-and-click adventure game that released a few months ago. I was able to build a ton of stuff that actually made it on screen and it was so much fun working with those guys. Since the game has been out for a while I think I can safely post some of the things I worked on without ruining things for most people.

This is just some minor prop stuff first. 


This is the rug that you find Pea under in the green half of the 50/50 room. So fuzzy.


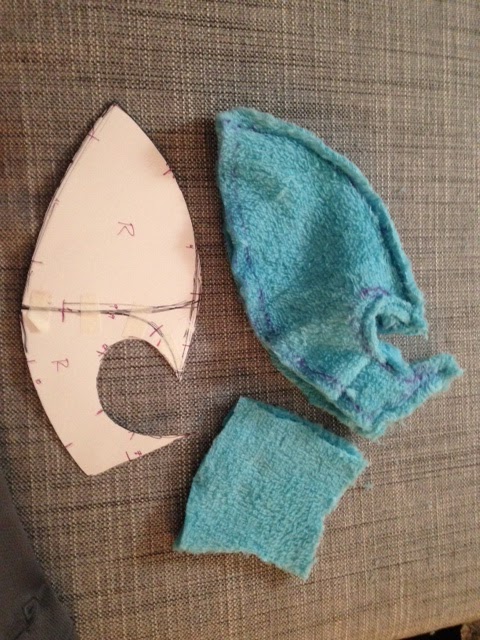
 These are two different scales of the Declaration of IndependAnts that Thomas JeffersAnt is holding.
I don't remember why we needed two scales but those tiny stamps were a pain to make. The paper is made of painted foil and the ribbons are lined with wire so they can be animated.


I made a square version of Tommy to so some replacement animation for a gag or something, but I don't know if that made it in.


Here is a good look at the Wheely Birds that get chased around by the Mongrel. Their wheels really roll.


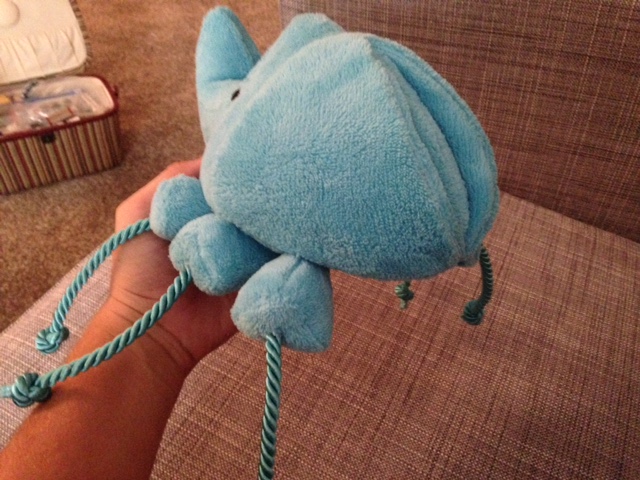
This is the mini version of the Mongrel who is seen in the into. The Mini Mongrel is the star of the window scenes where he chases the Wheely Birds.


This guy is the Squarely Beast. You meet him early on and he is a big help. He is basically a big shaggy square cow.


Here are some shots of Tower 1. They wanted the exterior to reflect the patterning and themes of the interior levels, but the proportions are obviously skewed to make it more visually interesting. It's pretty fun to try to figure out which room is which from the game.


  Here is a detail shot of the exterior of the Emerald Room on Tower 1. The crystal on the top was really fun to make. It is pieces of plastic packaging from some trash that I cut up, glued together and painted so that it looks like a real translucent crystal with hard facets and everything.


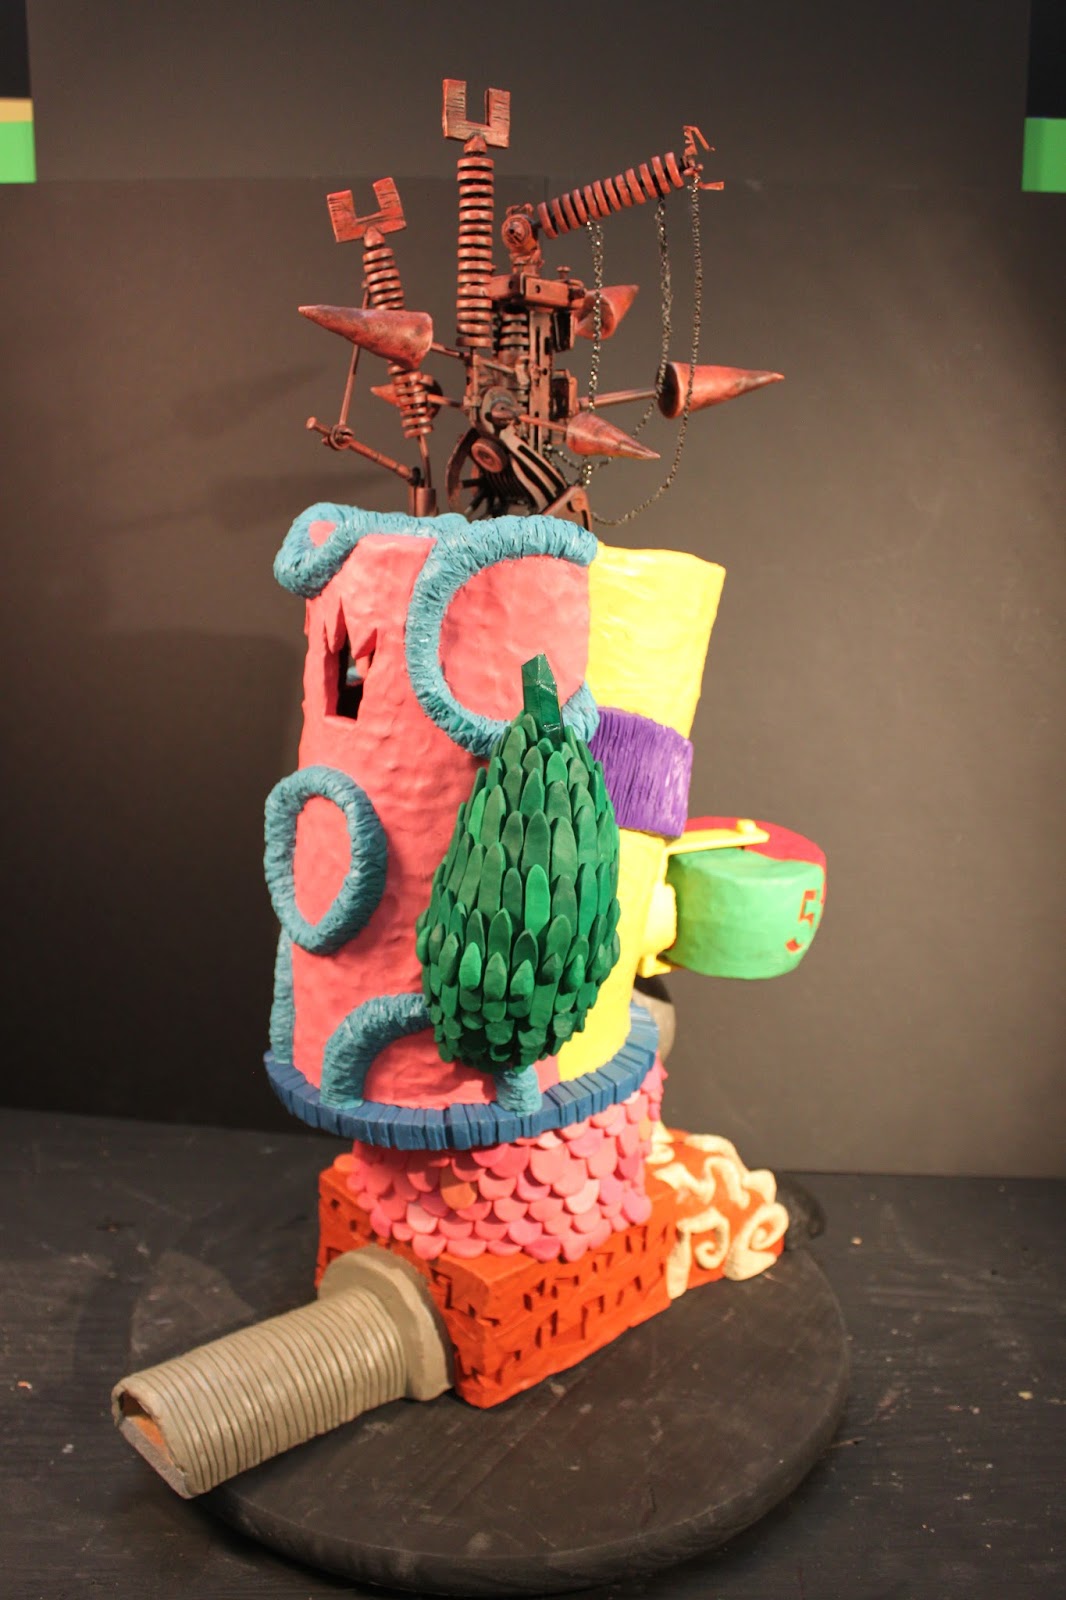
This antenna thingy on the top was made with a bunch of pieces from that Mouse Trap game. Most of them I killed with the heat gun and covered in Sculpey though.


Here are some shots of Tower 3. It had tank tracks to move it around that were really fun to make. They were mostly kit bashed from and old lamp and a broken CD deck with bits of Sculpey.


I guess I don't have pictures of Tower 2, but it was pretty cool because it had a working Accordian Room and some of the other rooms hanging from the branches by ribbon and the whole thing was up on claw feet. 


 This was probably my favorite thing to make in the whole game. It is one of the little hidden surprises the guys put in there. They basically just showed me the regular Zip Kicker and said make an outrageous, Big Daddy Ed Roth inspired, hot rod version of this.
It had to be modified in the game because it was a little too outrageous, but here is the original in all its glory.


 Yes, it does actually have working headlights and tail lights.


The shifter moves back and forth and has a tiny Mongrel skull on it.


The spoke wheel really spins.

Plush foam interior

It even has a tiny little serpentine belt.
'

There was a bunch of other stuff that I made that I don't have pictures of. If I can get back over there I will try to take more pics and post them. Hope you all enjoy getting a closer look at this beautiful game that I was able  to be a part of!


Thursday, November 19, 2015

Dyno Plushie

In September I foolishly decided that it was a good idea to start a project with 3 week old baby. I wanted to make a plush toy out of Dyno the rhinoceros beetle character from my senior film. It was for her so I guess the time and added strees was justified and now she has an awesome and meaningful first toy.
This is the sculpture I made of him earlier. It was perfect reference.


I started off by making a paper sculpture out of cardstock and tape in the scale that I wanted. I forgot to take a picture of that, but then I took it apart again to have pieces for a pattern and cut out my fabric. 
 This micro fleece/short minky fabric is really hard to find without those dumb dimple things in in, but I finally found some and the color was pretty perfect too.
Then I stitched together all the little pieces and turned them inside out. The little leg pieces I had to hand stitch because this fuzzy fabric is just too much to handle on little tiny corners.

 I did a bad thing. For the legs I decided to cut up my honors cords. I hope I'm not disgracing tradition or anything, but it was just the perfect thing and since Dyno rode with me during graduation I thought it was appropriate. I tied little knots in the ends and glued the tip to prevent fraying.

Attaching the cords to the leg pieces was also super tedious hand stitching.
I started filling the pieces with fluff and I stitched a piece thick plastic grocery bag into the wing casing pieces so that they make a crinkly noise and then hand stitched everything closed.
The only thing left to do was to hand stitch all the pieces together and do the eyes.
 For the eyes I basically just did a bunch of stitches all in the same area until they piled up and kinda look like sloppy embroidery.

 The wing casings aren't stitched closed on the center back line so they kinda are like pockets where you can put your hand in or whatever.
 I think she likes it. Hopefully it has some little features that will interest her like the crinkly back, fluffy pockets, and the dangly rope legs and give her a good variety of sensory stimulation.

Crimson Corsair Build (Part1)

So I noticed this awesome new character from the behind the scenes video of The Force Awakens and new instantly that I had found my next build. I only have these 2 reference photos and the name Crimson Corsair/ Captain Ithano to go on so it should be interesting. I hope to have it finished for the premiere! I got Imax tickets for the first showing on the 17th. Sooooooo excite!!!

Click image for larger version. 

Name: Screen-Shot-2015-07-10-at-11.06.16-PM-700x293.png 
Views: 137 
Size: 279.5 KB 
ID: 540973 
Click image for larger version. 

Name: vanity-fair-star-wars-02.jpg 
Views: 134 
Size: 385.9 KB 
ID: 540974

I decided to sculpt the mask and cast it in latex and then make the boots and gloves out of foam.

I built the armature for the mask sculpt with some wood scraps I had laying around and some drywall screws. I also screwed on a couple of pieces of heavy gauge aluminum wire on to support the wing shapes on the sides of the head. They will allow me to flex them into position and adjust them, but I hope will be strong enough to support the clay. It's about 8 or maybe 6 gauge wire. I had a bunch of old water based clay sitting around from school so I used that for the sculpt. I also bought some white hydrocal to make the mold.
.Click image for larger version. 

Name: IMG_2128.JPG 
Views: 16 
Size: 171.6 KB 
ID: 540981Click image for larger version. 

Name: IMG_2127.JPG 
Views: 17 
Size: 171.2 KB 
ID: 540979

I started packing my sculpture. It was still really sloppy 'cause I was just getting the rough shape of my head in. 

Click image for larger version. 

Name: IMG_2183.JPG 
Views: 17 
Size: 117.0 KB 
ID: 543688Click image for larger version. 

Name: IMG_2184.JPG 
Views: 17 
Size: 106.8 KB 
ID: 543689


Had to make a wire clay cutter so I didn't make much progress that day. I did adjust my proportions a bit though. I used calipers to take measurements of my own head and now I need to let it dry. Then I sprayed it with a little paint so I know where my original surface is for when I got into the full sculpt.
Click image for larger version. 

Name: IMG_2187.JPG 
Views: 43 
Size: 122.5 KB 
ID: 544188


Then I did a practice sculpt to feel out the shapes. I don't think I got the proportions quite right and I need to extend the eye sockets up the head, but that is why it's practice. I think the head should be a little more narrow from the front view. Overall I think it looks pretty good and I'm ready to start on the full size. Before I do though, I might try to make up something for the back of the head since there is no reference yet. I want to try to use some sort of a design that will hide the mechanism that will help me get the mask open so I can put it on and take it off. 

Click image for larger version. 

Name: IMG_2200.JPG 
Views: 13 
Size: 72.2 KB 
ID: 545235Click image for larger version. 

Name: IMG_2202.JPG 
Views: 11 
Size: 71.2 KB 
ID: 545236Click image for larger version. 

Name: IMG_2203.JPG 
Views: 13 
Size: 75.4 KB 
ID: 545237Click image for larger version. 

Name: IMG_2204.JPG 
Views: 11 
Size: 77.3 KB 
ID: 545238

I made the trek up to the fabric district in LA to pick up the cloth for the costume. Most of the stuff I found pretty quickly, but the coarse dark brown cloth with red stripes for the scarf/poncho thing was really tricky. I ended up getting some dark brown upholstery fabric with a really thick weave and some red textured yarn that I am in the process of stitching in for the stripes. It is a lot of work, but it was impossible to find that exact fabric. So, I got some two tone black/crimson sheer fabric for the shirt. I will stitch pieces to the shirt and fray them once it is sewn for the texture-y bits. I got some thick red chenille for the pants, some dark silver satin for the sash and a random remnant of black lycra for the mask lining and some other odds and ends.
Click image for larger version. 

Name: IMG_2207.JPG 
Views: 16 
Size: 320.7 KB 
ID: 545681Click image for larger version. 

Name: IMG_2208.JPG 
Views: 20 
Size: 126.7 KB 
ID: 545682

I got a little time to fix some of the proportions ad then I started putting in some of the details, straightening the lines and smoothing out the surfaces. I kinda made up a lot of detail for the back because there is no reference. I added those protrusions in the back near the base of the skull to imitate the shapes near the front along the jaw. I know from the side profile there is a little glimpse of the back and it doesn't have those but it really needed something so whatever. Creative license. It will also help me hide the slits I will need to open the back and get the mask on and off.

Click image for larger version. 

Name: IMG_2238.JPG 
Views: 21 
Size: 128.4 KB 
ID: 549158Click image for larger version. 

Name: IMG_2239.JPG 
Views: 17 
Size: 106.8 KB 
ID: 549159Click image for larger version. 

Name: IMG_2240.JPG 
Views: 15 
Size: 86.1 KB 
ID: 549160Click image for larger version. 

Name: IMG_2241.JPG 
Views: 14 
Size: 110.0 KB 
ID: 549161Click image for larger version. 

Name: IMG_2242.JPG 
Views: 15 
Size: 110.3 KB 
ID: 549162

Next I finished up the sculpt and textured it. I tweaked things a little bit and straightened out some lines and then just used a big grouting sponge to dab things smooth and erase the fingerprints.

Click image for larger version. 

Name: IMG_2269.JPG 
Views: 17 
Size: 107.1 KB 
ID: 553124Click image for larger version. 

Name: IMG_2270.JPG 
Views: 13 
Size: 119.4 KB 
ID: 553125Click image for larger version. 

Name: IMG_2271.JPG 
Views: 14 
Size: 105.9 KB 
ID: 553126Click image for larger version. 

Name: IMG_2272.JPG 
Views: 13 
Size: 93.8 KB 
ID: 553127

I bought a piece of steel roof trim, hammered it flat, and then cut it into squares to make the dividing wall between the two halves of the mold. Then I hammered them close together into the sculpt and hot glued them together. The wings off the sides of the head were really tricky because they are so thin and the metal cards just cut all the way through them. They didn't stay in very well without hot glue and the two halves of the wings risk being misaligned. I built a little wall around the bottom to catch the drippings, make the mold thicker and to be able to fill under the chin. I just used little bits of clay stuck to the wall to make the registration pegs so I can get the halves lined back up cause I'm cheap like that. I sprayed two coats of really light shellac on it before I started with the hydrocal just to make it stronger and kind of seal it so that I didn't smear any of the details while making the mold. I mixed up a thin batch of hydrocal and brushed it on with a paintbrush for a couple of layers to make sure that there weren't any bubbles in the detail areas. Then I used a thicker batch to slather on with squares of burlap and build up the mass. Once I got the whole thing as thick as the outer wall I smoothed it all out and let it dry. I should have been more careful to smooth out each layer, but at one point I had a batch setting very quickly and had to just cake it on as fast as I could so there will probably be bubbles inside. Hopefully they won't cause too much trouble. under the chin was also a really tricky area because the wall on the bottom was too close and I could barely get my fingers under there to make sure there were no bubbles. 

Click image for larger version. 

Name: IMG_2275.JPG 
Views: 13 
Size: 113.1 KB 
ID: 553138Click image for larger version. 

Name: IMG_2276.JPG 
Views: 9 
Size: 111.8 KB 
ID: 553139Click image for larger version. 

Name: IMG_2277.JPG 
Views: 9 
Size: 120.5 KB 
ID: 553140Click image for larger version. 

Name: IMG_2278.JPG 
Views: 9 
Size: 117.2 KB 
ID: 553141

I have officially finished the mold. I ran into a little hiccup with the second half. I ran out of hydrocal about halfway through and ended up with a batch that was too watery. I stupidly decided to try to put it on anyway and try to soak it up with lots of burlap scraps so it wouldn't go to waste. That led to the clay walls I put up collapsing and all the plaster running all over the back half of the mold and the ground. Thanks to a quick refill of hydrocal from a friend at work I was able to get back on track tonight and got it finished. Now I just have to wait for it to dry out and then I can crack it open to see if it turned out.

Click image for larger version. 

Name: IMG_2288.JPG 
Views: 8 
Size: 149.8 KB 
ID: 553987Click image for larger version. 

Name: IMG_2289.JPG 
Views: 9 
Size: 145.3 KB 
ID: 553988

The back half is a darker color because my friend gave me ultracal instead of the cheap hydrocal I was using, but it should turn out fine.

Saturday, September 26, 2015

Yoda Padawan Learner (Sculpt)

I am getting Star Wars fever so bad right now waiting for episode 7 so I did a quick 3 hour sculpt the other day of Yoda. I wanted to see what it would look like if he was a young rebellious padawan. I am really happy with how it came out and it was one of those things that just came out very easy and naturally which is not that common for me.


Wednesday, February 11, 2015

Animator Rat

So...I found this old figurine of Animator Mickey with the head broken off and I just had to do something. I sculpted a new head for him and now he is good as new.

Play Logo

Here is the logo that I designed for my senior film.

Alien Bug

I cleaned up one of the sketches from figure drawing for the cover image of my portfolio submission. I was experimenting with some texture overlays and halftone effects and I think it turned out pretty cool.