SO I have been working on my Reinhardt figurine pretty steadily and so I thought I should show some progress pics. I have most of the body done except for a few detail areas that I am saving for last. I need to finish up the arm and his hammer and shield. Then I can attach the pauldrons and do the final detail work.
Showing posts with label sculpture. Show all posts
Showing posts with label sculpture. Show all posts
Wednesday, February 24, 2016
Tuesday, February 9, 2016
Reinhardt Figurine (WIP)
I wanted to get some practice with the clay we use at work so I decided to sculpt a little figurine of one of the characters from Blizzard's new game Overwatch. They have so many interesting and unique characters that it was really hard to choose but I finally settled on Reinhardt. I really liked the big chunky look of this massive robotic suit of armor and thought it would be a good challenge.
I started out just slapping clay on my armature to get the pose in.
As I started refining the forms and getting a little detail I was having a hard time reaching in some of the areas so I removed the clay from the arms .
It has been pretty tricky figuring out how all the little armor plates slide around as the character twists and poses.
I have most of the detail done on the torso and I just need to finish up the back and then I will move on to the legs. It was super cool of Blizzard to post the model sheets of all these characters. Now I have perfect reference for all the little detail areas. It is slow going, but I will post more as it gets farther along.
Saturday, January 30, 2016
Hedgehog Bookends
Back in December I made some bookends for some good friends of ours as a Christmas gift. I used a chunk of a pine branch I had laying around and sculpted some little hedgehogs to go on top.
I split the stump in half and sanded the sides flat. Then I carved up the top of the stumps to look more natural like a stump in the forest.
So I got a little dish full of ice water and my small hot glue gun and pretty much just squirted a bunch of strings into the water.


The hedgehogs are not attached to the logs but I put small dots of hot glue on their feet so they can grip to the painted surface.
I split the stump in half and sanded the sides flat. Then I carved up the top of the stumps to look more natural like a stump in the forest.
I wanted something to make them more than just a chunk of wood so I made a bunch of little mushrooms and fungus out of hot glue.
So I got a little dish full of ice water and my small hot glue gun and pretty much just squirted a bunch of strings into the water.
They formed kind of like noodles that I cut up in little sections for the stems of the mushrooms.
then i carefully put a little glob on the thinner end of the little stem and tapped the end of it into the mushroom cap shape with my finger that I had chilled in the ice water.
Then I dipped it in the ice water to solidify it.
once I had enough I glued them in a little cluster to the side of the log in a little crevice where the bark had chipped off.


For the shelf fungus I used the bottom of the water dish and made a half circle shape with the hot glue gun. Then I made layers underneath that of hot glue that got progressively smaller and smaller until they made a little upside-down peak. Once that set I popped it off and used the hot tip of the glue gun to melt some rings of texture in the top of the steps where it was stuck to the dish. Then I glued them in place.
After that was all in place I gave it a few coats of shellac to seal the wood.
I painted everything black first and then silver to make it look like metal.
The hedgehogs are not attached to the logs but I put small dots of hot glue on their feet so they can grip to the painted surface.
The silver really helps to make it all unified and fancy looking.
I had some thin black leather that I cut out and glued them to the bottom with rubber cement so they don't scratch the surface they are put on.
Here they are with the hedgehogs posed on them.
Not bad for a nights work.
Friday, November 20, 2015
Armikrog Fabrication
Last year I worked as an intern at Pencil Test Studios and had an awesome time making stuff for Armikrog. Mike Dietz and Ed Schofield are the dynamic duo behind this fun and quirky stop motion point-and-click adventure game that released a few months ago. I was able to build a ton of stuff that actually made it on screen and it was so much fun working with those guys. Since the game has been out for a while I think I can safely post some of the things I worked on without ruining things for most people.
Here is a detail shot of the exterior of the Emerald Room on Tower 1. The crystal on the top was really fun to make. It is pieces of plastic packaging from some trash that I cut up, glued together and painted so that it looks like a real translucent crystal with hard facets and everything.


This is just some minor prop stuff first.
This is the rug that you find Pea under in the green half of the 50/50 room. So fuzzy.
These are two different scales of the Declaration of IndependAnts that Thomas JeffersAnt is holding.
I don't remember why we needed two scales but those tiny stamps were a pain to make. The paper is made of painted foil and the ribbons are lined with wire so they can be animated.
I made a square version of Tommy to so some replacement animation for a gag or something, but I don't know if that made it in.
Here is a good look at the Wheely Birds that get chased around by the Mongrel. Their wheels really roll.
This is the mini version of the Mongrel who is seen in the into. The Mini Mongrel is the star of the window scenes where he chases the Wheely Birds.
This guy is the Squarely Beast. You meet him early on and he is a big help. He is basically a big shaggy square cow.
Here are some shots of Tower 1. They wanted the exterior to reflect the patterning and themes of the interior levels, but the proportions are obviously skewed to make it more visually interesting. It's pretty fun to try to figure out which room is which from the game.
This antenna thingy on the top was made with a bunch of pieces from that Mouse Trap game. Most of them I killed with the heat gun and covered in Sculpey though.
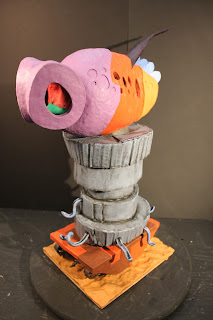
Here are some shots of Tower 3. It had tank tracks to move it around that were really fun to make. They were mostly kit bashed from and old lamp and a broken CD deck with bits of Sculpey.


I guess I don't have pictures of Tower 2, but it was pretty cool because it had a working Accordian Room and some of the other rooms hanging from the branches by ribbon and the whole thing was up on claw feet.
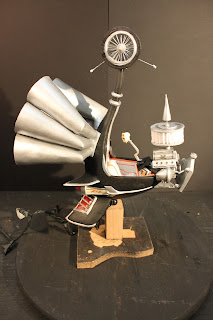
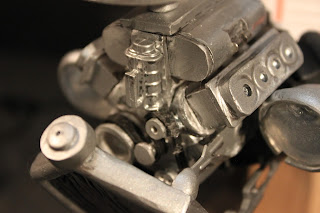
This was probably my favorite thing to make in the whole game. It is one of the little hidden surprises the guys put in there. They basically just showed me the regular Zip Kicker and said make an outrageous, Big Daddy Ed Roth inspired, hot rod version of this.
It had to be modified in the game because it was a little too outrageous, but here is the original in all its glory.
There was a bunch of other stuff that I made that I don't have pictures of. If I can get back over there I will try to take more pics and post them. Hope you all enjoy getting a closer look at this beautiful game that I was able to be a part of!
Subscribe to:
Posts (Atom)


